Learning how to use a pogo stick is one of the most rewarding physical skills a person can master. On the surface, it looks incredibly simple: you step onto two pegs, hold onto a handlebar, and hop up and down. However, the moment your feet leave the safety of the ground, you quickly realize that mastering a pogo stick is a complex dance of kinetic physics, core stabilization, and micro-adjustments in dynamic balance.
Whether you are a parent trying to teach your child on a classic foam-covered toy in a quiet suburban driveway in Houston, an adventurous fitness enthusiast using a heavy-duty spring stick for low-impact cardio in San Francisco, or an aspiring extreme athlete looking to clear obstacles on a high-pressure pneumatic cylinder in New York City, this comprehensive guide is your ultimate roadmap.
Welcome to bestpogostick.com, the premier resource for all things bounce across the United States. In this definitive guide, we will break down the exact biomechanics, step-by-step progressions, safety protocols, and advanced riding strategies to take you from a complete beginner to a confident, high-flying rider.
The Biomechanics of Balance: How Pogoing Works
Before you step onto the pegs, it helps to understand the hidden science that keeps a rider upright on a single vertical shaft. Unlike a bicycle or a skateboard, which relies on forward momentum and gyro forces to maintain lateral stability, a pogo stick relies almost entirely on your core musculature and your body’s relation to the Center of Mass (CoM).
                   [THE ALIGNMENT VECTOR]

                     ( Head & Eyes Forward )
                               │
                               ▼
                        [ Straight Spine ]
                               │
                               ▼
                     [ Tightened Core Base ]
                               │
                               ▼
                     ( Hips Over Footrests )
When you are mid-bounce, you are essentially balancing on a moving point-source of energy. To maintain your equilibrium, your body must obey a basic torque distribution formula:
$$\tau = F \cdot r \cdot \sin(\theta)$$
Where $\tau$ represents the rotational torque pulling you off balance, $F$ is the downward force of your landing, $r$ is the distance between your actual Center of Mass and the center line of the pogo shaft, and $\theta$ is the angle of the stick relative to the ground.
If your posture leans too far forward or backward, the angle ($\theta$) increases, generating a high rotational torque ($\tau$) that pushes the base of the pogo stick out from underneath you, resulting in a fall. To stay completely stable, you must keep the stick as close to 90 degrees (perfectly vertical) as possible, keeping your Center of Mass directly over the central spring chamber.
Pre-Flight Check: Safety Gear and Choosing Your Terrain, How to use a pogo stick
To ensure your first experience is safe and highly successful, you need to set up your environment and gear correctly before your feet ever touch the footrests.
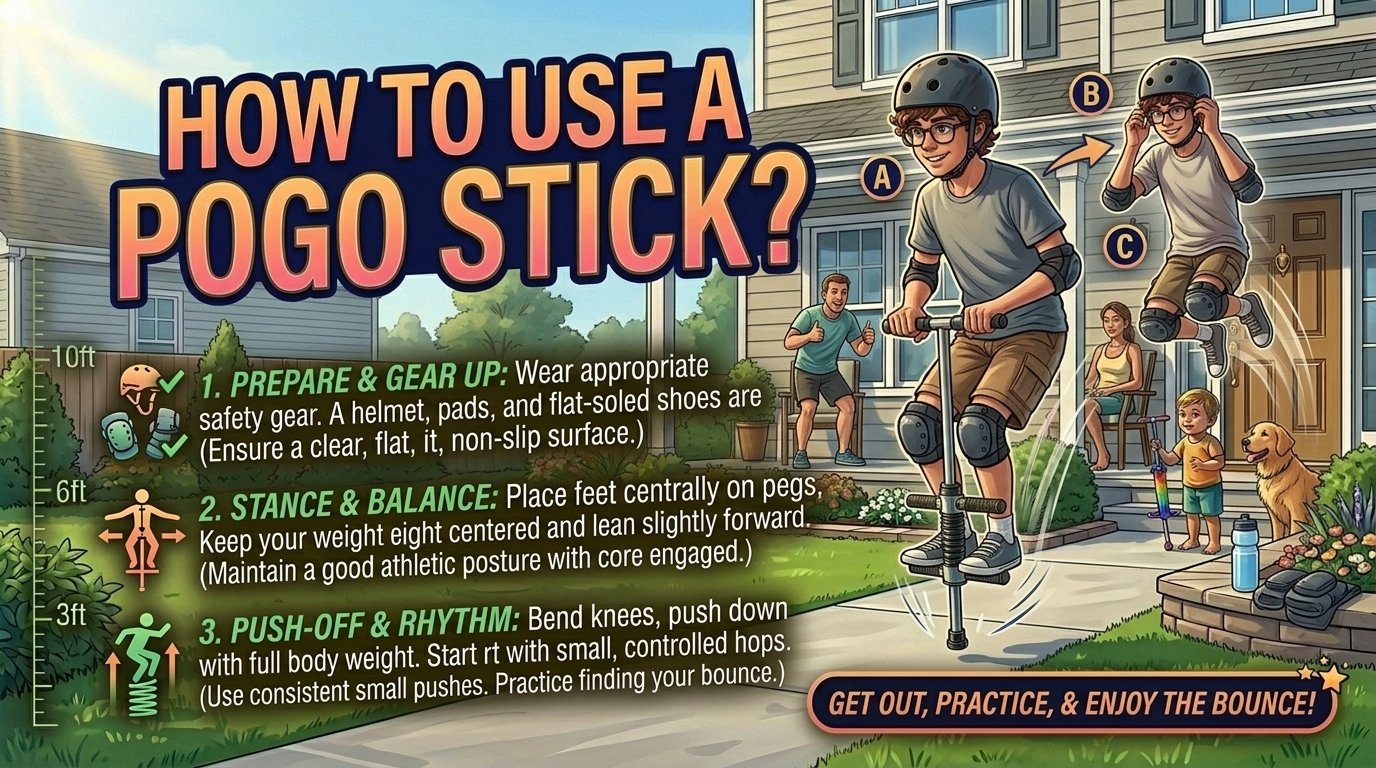
1. The Safety Gear Protocol
Never skip safety gear, especially when you are first learning the muscle memory required to ride. Falls happen fast, and concrete is unforgiving.
The Helmet: A standard, properly fitted CPSC-certified skateboard or bicycle helmet is mandatory. Ensure it sits level on your forehead and doesn’t tilt back.
Footwear Selection:Never attempt to ride a pogo stick barefoot, in flip-flops, or in smooth-soled dress shoes. You need a flat-bottomed sneaker with excellent rubber traction (such as skate shoes, basketball sneakers, or running shoes) that can firmly grip the cross-hatching on the metal footpegs.
Pads: For absolute beginners and children, wearing lightweight elbow pads and knee pads will give them the confidence to commit to the bounce without fear of scraping their joints.
2. Finding the Perfect Training Ground
Your choice of surface can make or break your ability to learn.
Ideal Terrain: You want a completely flat, level, and clean concrete or smooth asphalt surface. A backyard concrete patio, an empty basketball court, or a flat section of a paved driveway are perfect choices.
Terrain to Completely Avoid: Stay away from grass, dirt, gravel, or wet pavement. Grass and dirt absorb all the kinetic energy of the spring, grinding your bounce to a halt. Loose gravel can slide out from under the rubber tip instantly, while wet surfaces remove all traction between the tip and the ground.
Step-by-Step Guide: How to use a pogo stick
Now that you have your gear on and a clean training space, it is time to master the fundamental mounting progression. Treat these steps as a gradual ladder—do not move to the next stage until the current one feels natural and controlled.
[1. The Anchor Position] ──► [2. The Power Step-Up] ──► [3. The Launch Phase]
Step 1: The Anchor Position
Place your pogo stick vertically in front of you. Stand directly behind it, gripping both handlebars firmly with both hands. Tilt the top of the pogo stick slightly toward your chest, resting it gently against your belt buckle or lower torso. This three-point stance (both hands on the bars, shaft resting against your body) forms a rock-solid, stable tripod that anchors the stick before you lift your feet.
Step 2: The Power Step-Up
Identify your dominant foot (the foot you naturally lead with when climbing a flight of stairs or kicking a soccer ball). Place your dominant foot squarely onto its corresponding footrest peg, pushing it tightly against the central metal shaft to maximize stability. Keep all your weight on your non-dominant foot, which is still resting flat on the concrete ground.
Step 3: The Launch Phase
Take a deep breath and look straight ahead—do not look down at your feet. In one smooth, confident motion, press down hard with your dominant foot, step your non-dominant foot up onto the vacant peg, and immediately jump straight up into the air.
The Golden Beginner Rule: Do not try to stand still on the pogo stick like a ladder. A pogo stick only provides stability when it is actively moving. The very instant your second foot leaves the pavement, you must commit to your first downward hop to compress the spring.
Mastering the Mechanics: Mid-Flight Posture and Rhythm – How to use a pogo stick
Once you have successfully executed the launch and achieved your first few consecutive hops, you need to lock in the proper structural riding form to sustain your bounce. Is pogo sticking bad for your knees?
+-------------------------------------------------------------------+
|                  THE PERFECT RIDING SPEC SHEET                    |
|                                                                   |
|  [Head Position]     Eyes up, tracking the horizon 15 feet ahead  |
|  [Shoulder Line]     Relaxed, square, directly over the T-bar     |
|  [Elbow Geometry]    Slightly flared outward for steering leverage|
|  [Knee Mechanics]    Acting as secondary shock absorbers          |
+-------------------------------------------------------------------+
1. The Dynamic Pull-Up Technique
One of the most common mistakes beginners make is letting their arms go completely limp, letting the pogo stick do all the work. To maintain a strong, steady rhythm, you must actively participate in the upward phase of the bounce. As the internal spring rebounds and pushes you upward, use your upper body and arms to gently pull the handlebars upward toward your chest. This keeps the footrests locked tight against the soles of your shoes, preventing your feet from slipping off mid-air.
2. Lower Body Shock Absorption
When the pogo stick returns to the ground, your legs should never be completely locked out or rigid. Treat your knees and hips like a vehicle’s secondary suspension system. As the pogo stick hits full compression, bend your knees slightly to absorb a portion of the impact force. As the spring transitions to expression, extend your legs powerfully to drive the stick back into the sky.
3. How to Execute a Controlled Dismount
Knowing how to safely get off the pogo stick is just as important as knowing how to stay on. When you feel yourself losing your balance or getting tired, don’t try to save the bounce. Instead, deliberately use your next upward rebound to step one foot backward off its peg, planting it firmly on the ground while holding onto the handlebars with both hands to keep the machine from flying away. Why is my air pogo stick losing pressure?
Systematic Problem-Solving for Beginners – How to use a pogo stick
If you are struggling to string together more than five consecutive bounces, analyze your movement patterns against this troubleshooting matrix:
Common Riding Issue
Root Mechanical Cause
Direct Postural Correction
Expected Success Outcome
Drifting Continuously Forward
Your head is down, your shoulders are leaning past the T-bar, and your weight is too far forward.
Lift your eyes to the horizon, pull your shoulders back, and keep your spine aligned vertically over the pegs.
The pogo stick will drop straight down, keeping you in a stationary, controlled bounce.
Feet Slipping Off the Pegs
You are letting your arms go limp, allowing the stick to fall away from your shoes during the peak of the jump.
Actively pull the handlebars upward during the lift phase to keep constant pressure between the pegs and your shoes.
Your feet will stay locked to the traction pads throughout the entire jumping cycle.
The Base Tip Skidding Out
You are landing with the shaft tilted at an angle instead of perfectly vertical (90 degrees).
Ensure the tip hits the pavement directly underneath your center of mass; avoid reaching forward with the base.
The rubber tip will compress flat against the concrete, providing a solid, non-slip launchpad.
Tiring Out After 30 Seconds
You are using raw muscle power to jump rather than letting the mechanical spring do the work.
Relax your upper body, jump rhythmically with the spring’s natural timing, and let the steel coil carry your weight.
Your stamina will instantly double, allowing for longer, more effortless sessions.
Stepping Up: Transitioning to Advanced Air
Once you can effortlessly complete 100 consecutive stationary bounces without breaking a sweat, you have successfully built the core muscle memory required to ride. From here, you can begin exploring advanced techniques and movement styles. Can you lose belly fat by riding a pogo stick?
1. Directional Travel (The Lean-and-Hop)
To move around your environment rather than staying in one spot, you must master the art of the micro-lean. To move forward, tilt the upper handlebar column forward by just a fraction of an inch during your ascent. This shifts the force vector of the spring, causing the base tip to hop forward on its next land. To change directions or turn around, use your hips to twist the frame of the pogo stick while it is weightless at the very apex of your jump.
2. Introduction to Basic Stunt Metrics
For those riding high-performance spring sticks or pneumatic air systems (like a Vurtego or a Flybar), the world of street stunts opens up:
The One-Footed Bounce: Once mid-air, briefly lift your non-dominant foot completely off its peg, holding it out to the side for balance before returning it cleanly to the traction pad before landing.
The No-Hander: A highly advanced maneuver where the rider pinches the main pogo shaft firmly between their inner knees and thighs at the peak of a high jump, momentarily releasing their hands from the grips.
The Peg Grab: Launching deep into the air, bending your knees to pull the base of the machine upward, and reaching down with one hand to touch the metal footrest before descending.
Comprehensive Care and Equipment Maintenance Protocol
Inspect the base for deep cracks, rounded edges, or exposed metal underneath; clear away embedded gravel.
Before every single ride session.
Prevents dangerous slips and ensures maximum grip on concrete surfaces.
The Central Slider Shaft
Wipe away dirt and road dust with a clean rag; apply a few drops of light, non-sticky silicone lubricant.
Once every two weeks.
Eliminates internal friction, giving you a smoother, completely silent bounce.
Handlebar Rubber Grips
Clean off hand sweat and dirt with warm, soapy water; ensure the grips are tight and don’t twist on the bar.
Once a month.
Guarantees a solid, non-slip hold on the bars during high-impact landings.
Footrest Attachment Bolts
Check that all structural frame bolts and peg clamps are torqued down tight using an Allen wrench.
Every three months.
Prevents the footrests from shifting or loosening mid-jump.
Frequently Asked Questions (FAQ)
1. Is there a strict weight limit for using a pogo stick?
Yes, weight limits are absolutely critical for spring-powered pogo sticks. Every traditional spring model is engineered for a specific weight bracket (e.g., 40–80 lbs for kids, or 120–210 lbs for adults). If a rider is too light for the spring, it won’t compress at all; if they are too heavy, they will bottom out the metal spring completely, which can damage the machine and cause a jarring impact. Always check the exact manufacturer specifications before purchasing.
2. Can using a pogo stick replace my standard cardio workout?
Absolutely. Pogoing is an exceptional, high-intensity full-body workout. It burns calories at a rate similar to jumping rope or high-intensity interval training (HIIT), while simultaneously engaging your core, lower back, calves, and quads. Best of all, because the spring absorbs a significant portion of the landing force, it is much gentler on your ankles and knees than running on hard pavement.
3. How long does it typically take a beginner to learn how to bounce?
With the right gear and a flat concrete surface, most beginners can master the basic mounting technique and complete 10 to 20 consecutive bounces within 30 to 60 minutes of focused practice. Developing the advanced core endurance needed to ride continuously without getting tired usually takes a few weeks of consistent, short practice sessions.
4. What should I do if my pogo stick starts making a loud squeaking noise?
A loud squeaking or grinding noise usually means that dirt, dust, or moisture has made its way into the main spring housing or along the sliding inner shaft. To fix this, wipe down the exposed shaft with a clean microfiber cloth to remove any debris, and apply a premium, high-quality silicone-based spray lubricant directly to the sliding mechanism. Never use heavy automotive greases or WD-40, as they can attract dirt and clog up the internal components over time.
Conclusion: Take the Leap
Mastering a pogo stick is all about building confidence, finding your rhythm, and learning to trust your body’s natural balance. By choosing the right terrain, locking in a strong vertical posture, and learning to work with the spring rather than fighting against it, you will quickly unlock a smooth, weightless sensation that makes pogoing so addictive.
Get your helmet on, find a clear patch of concrete, stand tall over the pegs, and take that very first leap. The air is waiting for you!